Tutorial: Make a GitLab contribution
Anyone can contribute to the development of GitLab.
Maybe you want to add functionality that you feel is missing. Or maybe you noticed some UI text that you want to improve.
This tutorial will walk you through the process of updating UI text and related files by using the GitLab Development Kit and the GitLab community fork. You can follow this example to familiarize yourself with the process.
NOTE: We recommend joining our Discord server, where GitLab team members and the wider community are ready and waiting to answer your questions and ensure everyone can contribute.
Steps
To make a contribution, follow these steps:
- Prerequisites
- Step 1: Configure the GitLab Development Kit
- Step 2: Change the code
- Step 3: Push your changes to the community fork
- Step 4: Create a merge request
- Step 5: Complete the review process
View an interactive demo of the contribution process.
Prerequisites
On your local machine:
- Ensure Git is installed.
(From the command line, type
git -v. If you get a result, you have Git installed.) - Install a source code editor, or decide which tool you're going to use to edit files.
On GitLab.com:
- Create an account. Ensure you can successfully sign in.
- Click here
to request access to the community forks.
- The access request will be manually verified and should take no more than a few hours.
- You can get started without access, and only need it prior to pushing your changes to GitLab.com.
- NOTE: If you see an error, you are either: not signed in, or already have access.
Step 1: Configure the GitLab Development Kit
View an interactive demo of this step.
The GitLab Development Kit (GDK) is a local version of GitLab that's yours to play with. It's just like an installation of self-managed GitLab. It includes sample projects you can use to test functionality, and it gives you access to administrator functionality. You can run it on your local machine, or use GitPod to run a remote version.
We recommend using Gitpod for your first contribution, it will run the GDK regardless of your local hardware and software (e.g. operating system).
If you already have a working GDK, you should update it to use the community fork.
Using Gitpod
If you want to contribute without the overhead of setting up a local development environment, you can use Gitpod. Gitpod runs a virtual instance of the GDK.
Set aside about 15 minutes to launch the GDK in Gitpod.
- Launch the GDK in Gitpod.
- Create an account if this is your first time using Gitpod. After registering, you may need to relaunch GitLab in Gitpod.
- Select Continue with GitLab.
- If this is your first time using Gitpod with GitLab, select Authorize when prompted to Authorize Gitpod.io to use your account?.
- Leave the default repository URL:
gitlab.com/gitlab-community/gitlab/-/tree/master/. - Select your preferred Editor.
- Leave the default Class:
Standard. - Wait for Gitpod to launch.
You can begin exploring the codebase and making your changes once your editor of choice has launched.
You will need to wait a little longer for GitLab to be available to preview your changes.
A new GDK installation
NOTE: Skip this step if you're using Gitpod.
Set aside about two hours to install the GDK. If all goes smoothly, it should take about an hour to install.
Sometimes the installation needs some tweaks to make it work, so you should also set aside some time for troubleshooting. It might seem like a lot of work, but after you have the GDK running, you'll be able to contribute much more often and more easily.
To install the GDK:
-
Ensure you're on one of the supported platforms (macOS, Ubuntu, etc.).
-
Choose the directory where you want to install the GDK. In this location, a repository called
gitlab-development-kitwill be created, and the application will be installed. -
From the command line, go to that directory. In this example, we will use the
developmentdirectory.cd development -
Run the one-line installation command:
curl "https://gitlab.com/gitlab-org/gitlab-development-kit/-/raw/main/support/install" | bash -
For the message
Where would you like to install the GDK? [./gitlab-development-kit], press Enter to accept the default location. -
For the message
Which GitLab repo URL would you like to clone?, enter the GitLab community fork:https://gitlab.com/gitlab-community/gitlab.git
While the installation is running, copy any messages that are displayed. If you have any problems with the installation, you can use this output as part of troubleshooting.
When the installation is complete:
-
Go to the directory where the GDK was installed:
cd gitlab-development-kit -
Start the GDK:
gdk start -
Connect to the GDK by using the URL provided. It should be something like http://127.0.0.1:3000.
-
Use the username
rootand the password5iveL!fe. You will be prompted to reset your password the first time you sign in.
If you have any problems, try going to the gitlab-development-kit/gitlab
directory and running these commands:
yarn install && bundle install
bundle exec rails db:migrate RAILS_ENV=development
From the gitlab-development-kit folder, you can also try running gdk doctor.
For more advanced troubleshooting, see the troubleshooting docs.
An existing GDK installation
If you have an existing GDK installation, you should update it so it's using the community fork.
-
Delete the existing
gitlab-development-kit/gitlabdirectory. -
Clone the community fork into that location:
cd gitlab-development-kit
git clone https://gitlab.com/gitlab-community/gitlab.git
To confirm it was successful:
- Ensure the
gitlab-development-kit/gitlabdirectory exists. - Go to the top
gitlab-development-kitdirectory and rungdk stopandgdk start.
If you get errors, run gdk doctor to troubleshoot. For more advanced troubleshooting, see
the troubleshooting docs.
Step 2: Change the code
View an interactive demo of this step.
Now for the fun part. Let's edit some code.
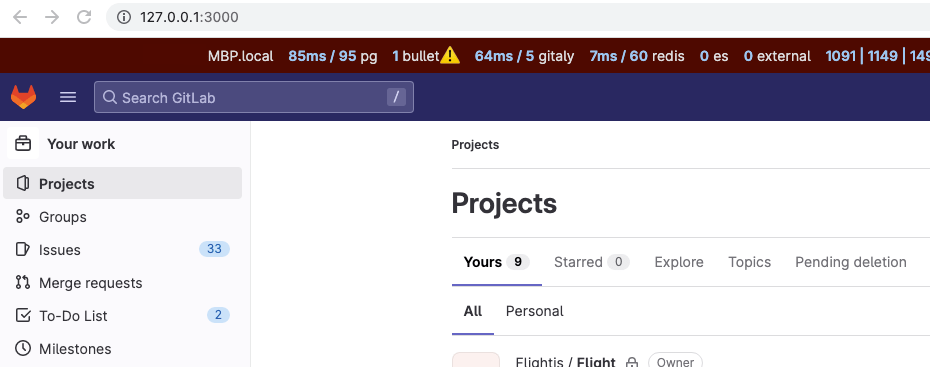
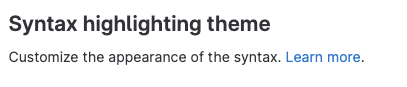
In this example, I found some UI text I'd like to change. In the upper-right corner in GitLab, I selected my avatar and then Preferences. I want to change this text:
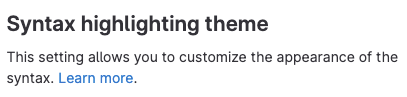
Other settings on the page start with the word Customize and skip the This setting allows you to part.
I'll update this phrase to match the others.
NOTE:
As this text has already been changed when developing this tutorial, you can instead search for Customize the appearance of the syntax to find the files that were changed.
-
Search the
gitlab-development-kit/gitlabdirectory for the stringThis setting allows you to customize.The results show one
.hamlfile, two.mdfiles, one.potfile, and several.pofiles. -
Open the
.hamlfile. This file is where the UI text resides. -
Update the string. In this case, I'll remove the words before
customizeand start the wordcustomizewith a capitalC. -
Save the file.
You can check that you were successful:
-
In the
gitlab-development-kit/gitlabdirectory, typegit statusto show the file you modified:modified: app/views/profiles/preferences/show.html.haml -
Refresh the web browser where you're viewing the GDK. The changes should be displayed. Take a screenshot.

Update the translation files
English UI strings are localized into many languages.
These strings are saved in a .pot file, which must be regenerated
any time you update UI text.
To automatically regenerate the localization file:
-
Ensure you are in the
gitlab-development-kit/gitlabdirectory. -
Run the following command:
tooling/bin/gettext_extractor locale/gitlab.potThe
.potfile will be generated in the/localedirectory.
Now, in the gitlab-development-kit/gitlab directory, if you type git status
you should have both files listed:
        modified:   app/views/profiles/preferences/show.html.haml
        modified:   locale/gitlab.pot
For more information about localization, see internationalization.
Update the documentation
Documentation for GitLab is published on https://docs.gitlab.com. When you add or update a feature, you must update the docs as well.
-
To find the documentation for a feature, the easiest thing is to search the docs site. In this case, the setting is described on this documentation page:
https://docs.gitlab.com/ee/user/profile/preferences.html -
The URL shows you the location of the file in the
/docdirectory. In this case, the location is:doc/user/profile/preferences.md -
Go to this location in your local
gitlabrepository and update the.mdfile and any related images.
Now when you run git status, you should have something like:
        modified:   app/views/profiles/preferences/show.html.haml
        modified:   doc/user/profile/img/profile-preferences-syntax-themes.png
        modified:   doc/user/profile/preferences.md
        modified:   locale/gitlab.pot
To view these changes in action, you can check out a merge request where these changes have already been made.
Step 3: Push your changes to the community fork
View an interactive demo of this step.
Now you're going to push your changes to the community fork. This is the next step in getting your changes put into the main GitLab repository.
-
Ensure you are in the
gitlab-development-kit/gitlabdirectory. -
Create a branch. You don't want to work in the
masterbranch. Instead, you want to create a branch for your work. In this example, we're going to call the branchui-updates.git checkout -b ui-updates -
Add the files to the staging area.
git add . -
Provide a commit message. GitLab has somewhat strict commit message guidelines. To be safe, a general rule is to use three to five words, start with a capital letter, and do not end with a period.
git commit -m "Updating UI text

Standardizing the text on this page so
that each area uses consistent language.

Changelog: changed"
The
Changelog: changedis because we're changing an existing feature. If we were adding a feature, we'd useChangelog: added. For details, see changelog entries. -
Push the changes to the community fork. At the same time, set the fork as your upstream, so that it will be in sync for any future contributions.
git push --set-upstream origin ui-updates
Step 4: Create a merge request
View an interactive demo of this step.
Now you're ready to push changes from the community fork to the main GitLab repository!
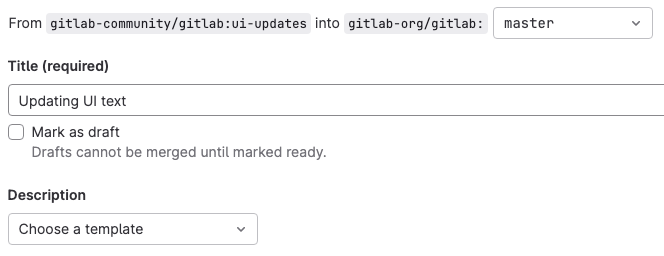
-
Go to the community fork on GitLab.com. You should see a message like this one:
Select Create merge request. If you don't see this message, on the left sidebar, select Code > Merge requests > New merge request.
-
Take a look at the branch names. You should be merging from your branch in the community fork to the
masterbranch in the GitLab repository. -
Fill out the information and then select Save changes. Don't worry if your merge request is not complete. If you don't want anyone from GitLab to review it, you can select the Mark as draft checkbox. If you're not happy with the merge request after you create it, you can close it, no harm done.
-
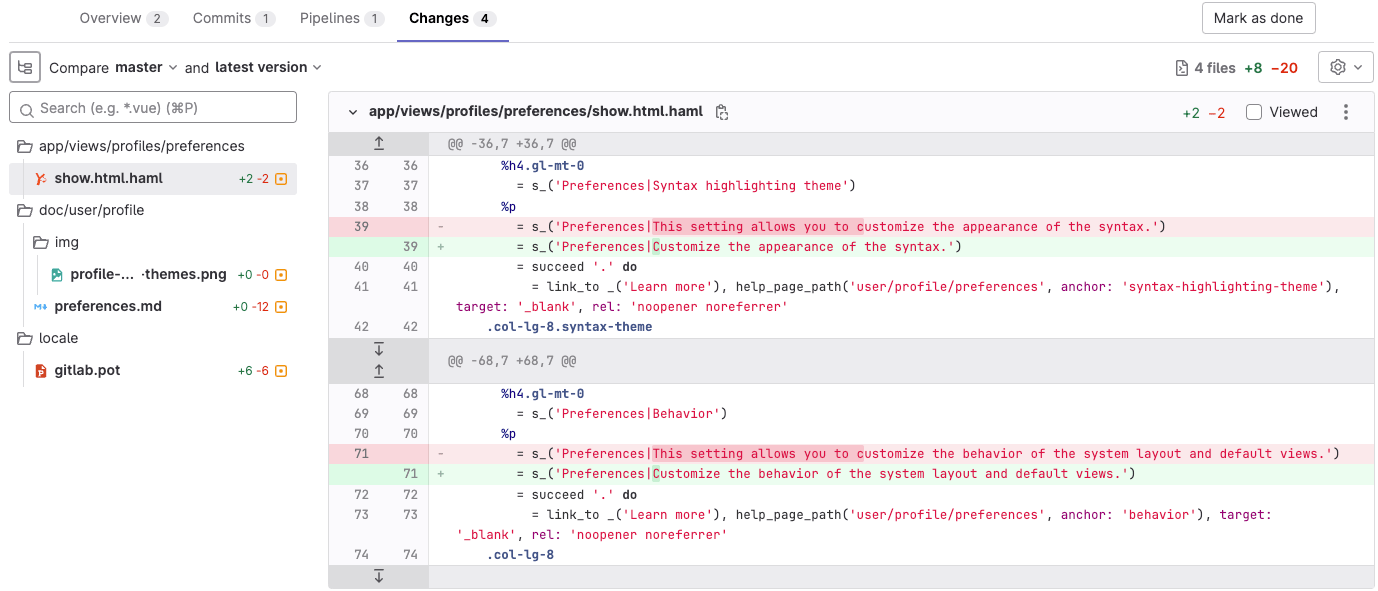
Select the Changes tab. It should look something like this:
The red text shows the code before you made changes. The green shows what the code looks like now.
-
If you're happy with this merge request and want to start the review process, type
@gitlab-bot readyin a comment and then select Comment.


Someone from GitLab will look at your request and let you know what the next steps are.
Now, any time you want to make a contribution to GitLab, you can just
go to the gitlab-development-kit folder and run gdk update. Then make
your changes in the gitlab directory and push them to the fork.
Step 5: Complete the review process
After you create a merge request, GitLab automatically triggers a CI/CD pipeline that runs tests, linting, security scans, and more.
Your pipeline must be successful for your merge request to be merged.
- To check the status of your pipeline, at the top of your merge request, select Pipelines.
- If you need help understanding or fixing the pipeline, in a comment, use the
@gitlab-bot helpcommand.
Getting a review
GitLab will triage your merge request automatically.
However, you can type @gitlab-bot ready in a comment to alert reviewers that your MR is ready.
- When the label is set to
workflow::ready for review, a developer reviews the MR. - When you have resolved all of their feedback and the MR has been approved, the MR is ready for merge.
If you need help at any point in the process, type @gitlab-bot help in a comment or initiate a
mentor session on Discord.
When the merge request is merged, your change becomes part of the GitLab codebase. Great job! Thank you for your contribution!